Preparing the Granite Stone
Before we can begin the actual carving process, we need to ensure that the granite stone is properly prepared. The quality of the craftsmanship of the final product depends heavily on the preparation of the stone.
The following are the essential steps to prepare the stone:
- Cleaning: Begin by cleaning the stone with a soft brush and water to remove any dirt or debris.
- Marking: Use a pencil to draw the design onto the stone. Make sure to use accurate measurements and markings to avoid any mistakes.
- Cutting: Use a diamond-tipped saw to cut the stone into a rough shape. Be sure to follow the markings closely.
- Smoothing: After the stone is cut, use a grinder to smooth out the rough edges and corners. This can be a time-consuming process, but it is critical to achieving a high-quality end product.
- Sanding: Once the shaping and smoothing are complete, you can use sandpaper of increasing grits to polish the stone and create a smooth surface.
It is important to note that the final shape and size of the sculpture will depend on the initial block of granite. Therefore, it is essential to choose the right size and shape before beginning the carving process.
In conclusion, preparing the granite stone for the Thiruvalluvar sculpture is a crucial step in the process, as it forms the foundation of the final artwork. Taking the time to carefully prepare the stone will ensure a smooth and successful carving process, and a stunning, high-quality end product that showcases true granite sculpture craftsmanship.
Carving the Thiruvalluvar Sculpture
Now that we have prepared the granite stone, it’s time to start carving the Thiruvalluvar sculpture. This is where your creativity and skills come into play.
It is essential to have a clear understanding of the design and the sculpture-making process. With that in mind, let’s dive into the steps you need to follow:
- Outline the statue: Start by drawing the outer shape of the statue on the granite stone. This will serve as a rough guide, allowing you to carve the statue’s basic shape.
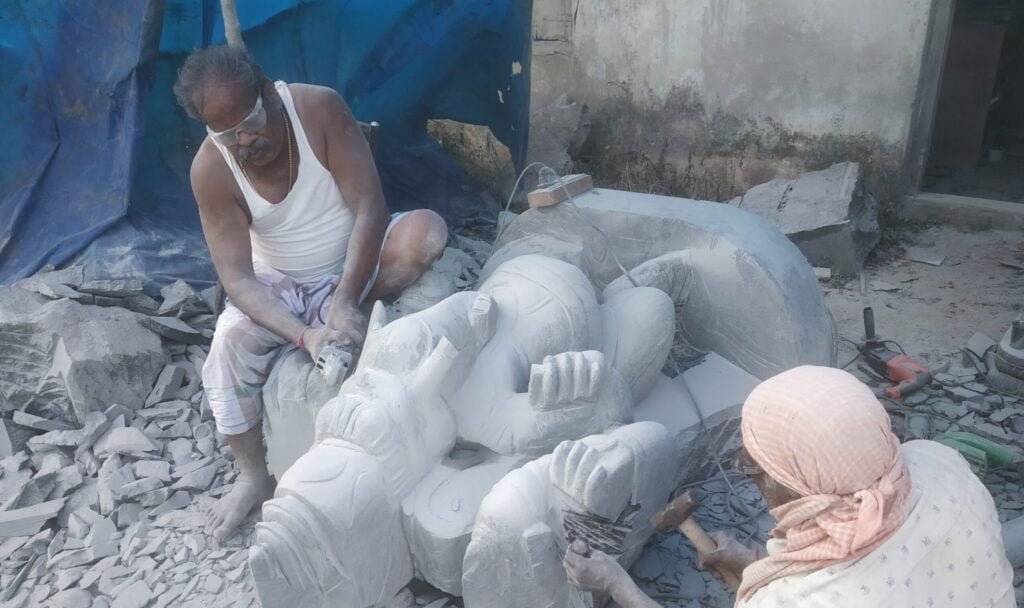
- Remove the excess: Using a chisel, hammer, and a diamond saw, start removing the excess granite from the statue. Begin with larger tools and gradually switch to smaller ones as the details become more refined. Be careful not to remove too much material in one go as it might damage the sculpture’s structure.
- Refine the details: Once the basic shape is complete, it’s time to refine the details. Use a small chisel and diamond-tipped tools to create intricate lines and ornamental designs. Take your time in this step to ensure all features are proportionate.
- Smooth the surface: After finishing the details, it’s time to smooth out the surface of the sculpture. Use sandpaper or a diamond polishing pad to create a consistent surface. Starting with coarse grit and gradually working your way to finer grits, will ensure a polished and refined surface.
- Finishing touches: Once you are satisfied with the shape and surface, focus on the finishing touches to enhance the look and feel. Use a small chisel or diamond-tipped tool to add a few final details that will make the statue stand out.
Remember, carving a Thiruvalluvar granite sculpture requires patience, skill, and attention to detail. Don’t rush the process, take your time, and refer to your design often. With practice and dedication, you will master the art of granite sculpture making in no time.
Refining the details
With the basic shape of the sculpture complete, it’s time to focus on refining the details. This is where your Thiruvalluvar sculpture will come to life and showcase the intricate features that make it unique.
- Take your time: One of the most important granite carving tips we can offer is to take your time when refining the details. Quality craftsmanship takes time and cannot be rushed.
- Use smaller tools: As you focus on the details, switch to smaller tools with finer points. These tools will allow you to work with greater precision and create delicate features.
- Use a magnifying glass: A magnifying glass can be a helpful tool when refining the details of your Thiruvalluvar sculpture. It will allow you to see small imperfections and make necessary adjustments for a polished finish.
When refining the details, it’s important to keep the overall design in mind. You want to ensure that the intricate features complement the overall shape and style of the sculpture.
“The details are not the details. They make the design.” – Charles Eames
Remember this quote when refining the details of your Thiruvalluvar sculpture. The details may seem small, but they can make a big difference in the final product.
Finishing touches and polishing
After the carving process is complete, it’s time to add the finishing touches to your Thiruvalluvar granite sculpture. This final step is crucial as it can make the difference between a good sculpture and a great one.
One of the most essential elements of a sculpture is its texture. To create a natural look and feel, use a chisel to add texture to the surface of the sculpture. This will give it a rougher appearance and make it seem more lifelike.
Once the texture is complete, it’s time to polish the sculpture. Use a polishing compound and a soft cloth to bring out the shine in the granite. This will give the sculpture a professional look and make it appear more polished and refined.
| Tip: | Use a soft, lint-free polishing cloth to avoid scratching the stone. |
|---|
| | Apply the polishing compound in a circular motion, focusing on one area at a time. |
|---|
| | Once the polishing is complete, allow the sculpture to dry for at least 24 hours before handling or displaying it. |
|---|
Displaying and preserving your Thiruvalluvar sculpture is just as important as creating it. If you plan to display it outdoors, choose a location that is well lit and free from direct sunlight.
When storing your sculpture, make sure to cover it with a cloth to protect it from dust and other debris. If you plan to move the sculpture, use caution, as granite sculptures can be heavy and delicate.
By following these tips and techniques, you can ensure that your Thiruvalluvar granite sculpture is not only a work of art but also a lasting tribute to the revered figure of Thiruvalluvar.
Displaying and Preserving the Sculpture
Now that your Thiruvalluvar granite stone sculpture is complete, it’s time to think about how you will display and preserve this cherished work of art. Proper display and preservation are vital to ensuring your sculpture retains its original beauty and stays in pristine condition for years to come.

Displaying the Sculpture
When choosing where to display your sculpture, consider the following:
- Location: Select a location where the sculpture can be easily admired but also protected from the elements. Preferably, choose an indoor area with ample space, natural light, and a neutral backdrop that will highlight the sculpture’s features.
- Lighting: Proper lighting can enhance the sculpture’s beauty and create an inviting ambiance. Use spotlights or track lighting to showcase the sculpture’s unique features and textures.
- Base: The sculpture’s base should be made of a sturdy material and designed to complement the sculpture’s overall appearance. A well-crafted base can give the sculpture a sense of stability and balance.
Once your sculpture is in place, take care to clean it regularly and monitor its condition to ensure it does not deteriorate over time.
Preserving the Sculpture
The following techniques can help you preserve your Thiruvalluvar sculpture:
- Regular cleaning: Use a soft-bristled brush and a mild cleaning solution to gently remove dust, dirt, and other debris from the sculpture. Do not use harsh chemicals or abrasive materials that may damage the sculpture’s surface.
- Protective coating: Consider applying a protective coating to the sculpture’s surface to guard against environmental factors such as pollution, moisture, and UV rays.
- Indoor storage: In case you need to store your sculpture, keep it indoors in a climate-controlled area with low humidity and minimal fluctuations in temperature. Make sure to wrap and cover the sculpture securely to avoid any scratches or chips.
By following these techniques, you can keep your sculpture in excellent condition and enjoy its beauty for many years to come.
Conclusion
In conclusion, creating a Thiruvalluvar granite stone sculpture can seem like a daunting task, but with the right tools, techniques, and guidance, it is an achievable endeavor. We hope this guide has provided you with valuable insights and knowledge into the process of creating a 3 feet masterpiece that pays homage to the revered figure of Thiruvalluvar.
Remember, the key to success lies in careful planning, skillful execution, and attention to detail. Whether you’re a seasoned artisan or a novice, taking the time to refine your skills and techniques will pay off in the final result.
Take pride in your craftsmanship, and don’t hesitate to consult with experts or seek out additional resources to help you achieve your creative vision. With patience, persistence, and a passion for the craft, you too can produce a timeless Thiruvalluvar granite stone sculpture that is sure to impress and inspire all who behold it.
FAQ
How long does it take to create a Thiruvalluvar granite stone sculpture?
The time it takes to create a Thiruvalluvar granite stone sculpture can vary depending on the complexity of the design and the experience of the sculptor. On average, it can take several weeks to several months to complete a 3 feet sculpture.
What tools are needed for granite sculpture making?
Some essential tools for granite sculpture making include chisels, hammers, rasps, files, saws, drills, and various sanding and polishing tools. It is important to have a variety of tools to ensure precise carving and detailing.
How do I design a Thiruvalluvar statue?
Designing a Thiruvalluvar statue involves careful research and consideration of the subject. You can gather inspiration from statues already created or come up with your unique design. Sketching and sculpting small maquettes can help visualize and refine your design before starting the actual sculpture.
What is the process of preparing the granite stone?
To prepare the granite stone for carving, it is important to clean the surface and remove any dirt or debris. Then, mark the outline of your design on the stone using chalk or a pencil. You can also create supporting structures or bases to hold the stone securely during the carving process.
How do I carve a Thiruvalluvar sculpture?
Carving a Thiruvalluvar sculpture requires precision and patience. Start by removing excess material around the outlined design using chisels and hammers. Gradually refine the shape, paying attention to details and proportions. Use various carving techniques and tools to achieve the desired texture and depth.
Any tips for refining the details of the sculpture?
To refine the details of your Thiruvalluvar sculpture, use smaller and more specialized carving tools. Pay attention to the facial features, clothing folds, and accessories. Take breaks and step back regularly to assess the overall look and make necessary adjustments.
How can I give my sculpture a polished appearance?
To achieve a polished appearance, start by sanding the surface of the sculpture with progressively finer grit sandpaper. This will smooth out any rough areas and create a more polished finish. You can also use polishing compounds or diamond pads to further enhance the shine and luster of the sculpture.
How should I display and preserve the Thiruvalluvar sculpture?
When displaying the Thiruvalluvar sculpture, choose a location that allows it to be seen and appreciated. Consider placing it on a pedestal or mounting it on a sturdy base. To preserve the sculpture, avoid exposing it to direct sunlight or extreme temperature changes. Regularly dust and clean the sculpture with a soft cloth to maintain its beauty.
Any final thoughts on creating a Thiruvalluvar granite stone sculpture?
Creating a Thiruvalluvar granite stone sculpture is a rewarding and intricate process. It requires dedication, skill, and attention to detail. By following the steps outlined in this guide and utilizing the provided tips and techniques, you can create a stunning masterpiece that pays homage to the revered figure of Thiruvalluvar.


